일단은 지금 제작중인 소셜차트라는 앱이 소셜네트워킹 앱이어서 사용자들이 글을 쓸 수 있도록 해야 해. 페이스북이나 트위터처럼 말이지.
이거 말고도 구현해야 할 것들이 굉장히 많지만 글을 쓸 수 있는 환경부터 만드는 게 더미 데이터를 넣으면서 테스트하기 좋을 거 같아서 글쓰는 페이지부터 만들고 있어.
1차적으로 해쉬태그와 url을 자동으로 인식해서 link preview를 보여주는 정도로만 구현중이야.

먼저 textfield에 hashtag와 url을 꾸며주는 건 detactable_text_field라는 flutter package를 사용했고👇
https://pub.dev/packages/detectable_text_field
detectable_text_field | Flutter Package
TextField with detection features. You can detect hashtags, at sign, url or anything you want. Helps you develop Twitter like app. Refinement of hashtagable
pub.dev
link preview와 metatag 빼내는 건 any_link_preview라는 flutter package를 사용했어.
https://pub.dev/packages/any_link_preview
any_link_preview | Flutter Package
Dart package that helps with preview of any links. Fully customizable and has the ability to render from cached data. Useful for apps where we had chat feature.
pub.dev
View는 아래 정도로 간단히 구현 가능하고
  body: SingleChildScrollView(
    child: Container(
      padding: const EdgeInsets.only(
        left: 10,
        right: 10,
        bottom: 50,
      ),
      child: Column(
        children: [
          DetectableTextField(
            keyboardType: TextInputType.multiline,
            detectionRegExp: hashTagUrlRegExp,
            decoration: const InputDecoration(
              hintText: "자신의 인사이트를 공유해보세요!",
              border: InputBorder.none,
            ),
            autofocus: true,
            maxLines: null,
            minLines: null,
            autocorrect: false,
            controller: controller.textController,
            onChanged: (value) {
              controller.userText = value;
            },
          ),
          Obx(
            () => controller.userLink != null
                ? Stack(
                    children: [
                      AnyLinkPreview(
                        displayDirection: UIDirection.uiDirectionHorizontal,
                        link: controller.userLink!,
                        bodyMaxLines: 3,
                        placeholderWidget: const Center(child: Text("로딩중")),
                        errorImage: "Error loding image",
                      ),
                      Positioned(
                        top: 0,
                        right: 0,
                        child: CupertinoButton(
                          minSize: 10,
                          padding: EdgeInsets.all(0),
                          onPressed: () => controller.userLink = null,
                          child: Icon(Icons.cancel, color: Colors.black45),
                        ),
                      )
                    ],
                  )
                : const SizedBox(),
          ),
        ],
      ),
    ),
  ),
Controller에서는 아래와 같이 구현할 수 있어.
class ScreenWriteController extends GetxController
    with GetSingleTickerProviderStateMixin {
  static final _urlRegExp = RegExp(
    "(?!\\n)(?:^|\\s)$urlRegexContent" + "( |\n)",
    multiLine: true,
  );

  var key = GlobalKey<FormState>();
  var textController = TextEditingController();

  final _userText = Rx<String>("");
  final _previewLink = Rxn<String>();

  final _linkData = Rxn<Metadata>();

  final _deletedLink = Rx<List<String>>([]);

  String get userText => _userText.value;
  set userText(String value) => _userText.value = value;

  String? get previewLink => _previewLink.value;
  set previewLink(String? value) => _previewLink.value = value;

  set deletedLink(String value) => _deletedLink.value.add(value);

  @override
  void onInit() {
    // TODO: implement onInit
    super.onInit();
    ever(
      _userText,
      (userText) async {
        Iterable<String> extractedLink =
            extractDetections(userText, _urlRegExp).isEmpty
                ? []
                : extractDetections(userText, _urlRegExp)
                    .where((element) => !_deletedLink.value.contains(element));
        if (extractedLink.isEmpty) return;
        AnyLinkPreview.getMetadata(link: extractedLink.first).then((value) {
          if (value != null) {
            _linkData.value = value;
            previewLink = extractedLink.first;
          } else {
            //do nothing!
          }
        });
      },
    );
  }

  @override
  void onReady() {
    // TODO: implement onReady
    super.onReady();
    //hide main navigation bar
    Get.find<MainNavigatorController>().isBottomTabVisible = false;
  }

  @override
  void onClose() {
    // TODO: implement onClose
    super.onClose();
    //show the main navigation bar again
    Get.find<MainNavigatorController>().isBottomTabVisible = true;
  }
}
이제 내용들을 저장해볼건데, 작성자, 작성일 이런 기본적인 것들을 포함해서 link preview 데이터 정도만 추가해주면 될 것 같아. 나머지는 차차 추가해보자. 난 유저가 작성한 글을 insightCard라고 부를거야.
난 firestore를 사용하고 있어. 그냥 단숨히 document에 string, int... 등을 쓰는 건 잘 되는데.. 또 다른 Map을 넣는 건 어떻게 하는지 모르겠네? ㅋㅋ 뭐 별거 있겠어? 그냥 해보는 거지 ㅋㅋㅋ 일단 model 고고 👇👇
class InsightCardModel {
InsightCardModel({
required this.createdAt,
required this.chartId,
required this.cardType,
required this.author,
required this.userText,
this.linkPreviewData,
this.replyCount = 0,
this.pinCount = 0,
});
final Timestamp createdAt; //creation time
final String chartId;
final String cardType;
final DocumentReference author; //userReference
final String userText;
final LinkPreviewData? linkPreviewData;
final int replyCount;
final int pinCount;
InsightCardModel.fromJson(Map<String, Object?> json)
: this(
createdAt: json['createdAt']! as Timestamp,
chartId: json['chartId']! as String,
cardType: json['cardType'] as String,
author: json['author'] as DocumentReference,
userText: json['userText'] as String,
linkPreviewData: json['linkPreviewData'] as LinkPreviewData?,
replyCount: json['replyCount'] as int,
pinCount: json['pinCount'] as int,
);
Map<String, Object?> toJson() {
return {
'createdAt': createdAt,
'chartId': chartId,
'cardType': cardType,
'author': author,
'userText': userText,
'linkPreviewData': linkPreviewData,
'replyCount': replyCount,
'pinCount': pinCount,
};
}
}
class LinkPreviewData {
LinkPreviewData({
required this.url,
this.image,
this.title,
this.description,
});
final String url;
final String? image;
final String? title;
final String? description;
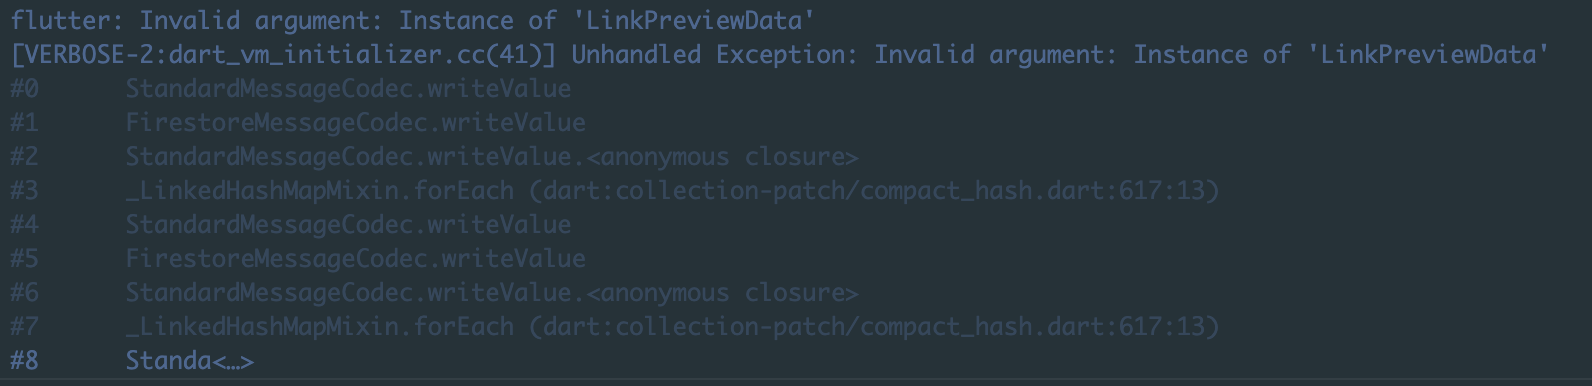
}이렇게 모델을 작성하고 firestore에 collection에 add로 문서 업로드를 시도해보니 ㅋㅋ 역시나 에러... Invalid ardument ㅎㅎ 뭐 당연한가? 못알아 먹던 json을 dynamic 속에 넣었다고 알아먹을리가 없으니까 ㅎㅎ
중첩되어 사용될 클래스에도 fromJson과 toJson을 추가해주고 그걸 메인 모델 클래스에서 사용하도록 하자구.
class InsightCardModel {
  InsightCardModel({
    required this.createdAt,
    required this.chartId,
    required this.cardType,
    required this.author,
    required this.userText,
    this.linkPreviewData,
    this.replyCount = 0,
    this.pinCount = 0,
  });
  final Timestamp createdAt; //creation time
  final String chartId;
  final String cardType;
  final DocumentReference author; //userReference
  final String userText;
  final LinkPreviewData? linkPreviewData;
  final int replyCount;
  final int pinCount;

  InsightCardModel.fromJson(Map<String, dynamic?> json)
      : this(
          createdAt: json['createdAt']! as Timestamp,
          chartId: json['chartId']! as String,
          cardType: json['cardType'] as String,
          author: json['author'] as DocumentReference,
          userText: json['userText'] as String,
          //여기!!!!!!
          linkPreviewData: LinkPreviewData?.fromJson(json['linkPreviewData']),
          replyCount: json['replyCount'] as int,
          pinCount: json['pinCount'] as int,
        );
  Map<String, dynamic?> toJson() {
    return {
      'createdAt': createdAt,
      'chartId': chartId,
      'cardType': cardType,
      'author': author,
      'userText': userText,
      //여기!!!!!!
      'linkPreviewData': linkPreviewData?.toJson(),
      'replyCount': replyCount,
      'pinCount': pinCount,
    };
  }
}

class LinkPreviewData {
  LinkPreviewData({
    this.url,
    this.image,
    this.title,
    this.description,
  });
  final String? url;
  final String? image;
  final String? title;
  final String? description;

  //추가!!!!!!
  LinkPreviewData.fromJson(Map<String, dynamic> json)
      : this(
            description: json['description'],
            image: json['image'],
            title: json['title'],
            url: json['url']);
  //추가!!!!!!
  Map<String, dynamic> toJson() => {
        "url": url,
        "image": image,
        "title": title,
        "description": description,
      };
}
그리고 나서 테스트를 해보면 👇

이제 더미 데이터를 몇십개 만들고 listview로 만들어 볼 예정. ㅎㅎ 더디긴 해도 진도가 나가긴 하네 ㅎㅎㅎ 셀프 화이팅이다 ㅋㅋㅋㅋㅋㅋ 안녕!
'Flutter > Flutter Project' 카테고리의 다른 글
| [소셜차트] 앱 제작기 #10. Tap to scroll top (0) | 2022.11.08 |
|---|---|
| [소셜차트] 앱 제작기 #9. 무한 스크롤 (0) | 2022.11.07 |
| [소셜차트] 앱 제작기 #6. Profile & Notice Screen Layout (1) | 2022.10.26 |
| [소셜차트] 앱 제작기 #5. Model and Firestore 1% (0) | 2022.10.24 |
| [소셜차트] 앱 제작기 #4. 로그인 시스템 구성 (0) | 2022.10.22 |